How Microsoft Power Platform is helping to modernize and enable...
In this webinar, our experts showcase a variety of demo use cases of how different components of the...
The idea of sending an email to a team in Dynamics 365 is routinely rejected based on the functionality limitation: Dynamics 365 does not allow us to send emails to a team. However, as with almost everything in Dynamics, there is always at least one workaround. Typically, the suggestions we hear are to do things like sending via a queue, installing third-party solutions, plugins, etc. In today’s blogpost, we will explore two different approaches to accomplishing the task of sending an email to a team.
In this first scenario, we are going to achieve this by creating a Flow in Power Automate. We will use FetchXML to fetch the members of the team and use it in the Flow. This is referenced in a Microsoft article, but the procedure is not included. Hence, we gave it a try and found a process that works perfectly for us. Below are the steps:
1. We need to get the FetchXML to retrieve the Team members. This can be achieved using XRMToolbox or Advanced Find.
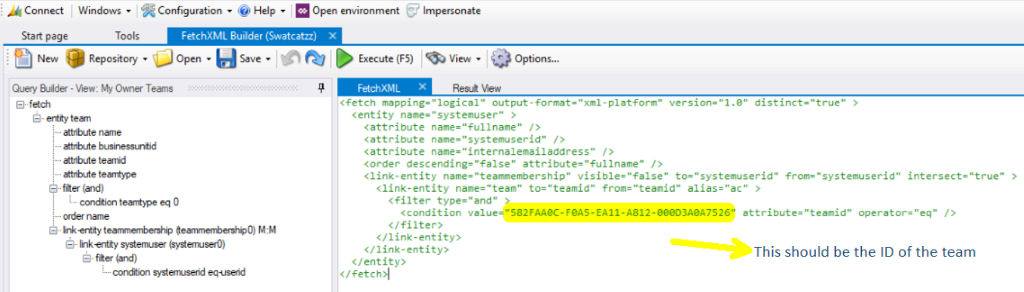
For reference, here is the XML that you could just edit with the respective Team GUID.
<fetch mapping="logical" output-format="xml-platform" version="1.0" distinct="true" >
  <entity name="systemuser" >
    <attribute name="fullname" />
    <attribute name="systemuserid" />
    <attribute name="internalemailaddress" />
    <order descending="false" attribute="fullname" />
    <link-entity name="teammembership" visible="false" to="systemuserid" from="systemuserid" intersect="true" >
      <link-entity name="team" to="teamid" from="teamid" alias="ac" >
        <filter type="and" >
          <condition value="582FAA0C-F0A5-EA11-A812-000D3A0A7526" attribute="teamid" operator="eq" />
        </filter>
      </link-entity>
    </link-entity>
  </entity>
</fetch>
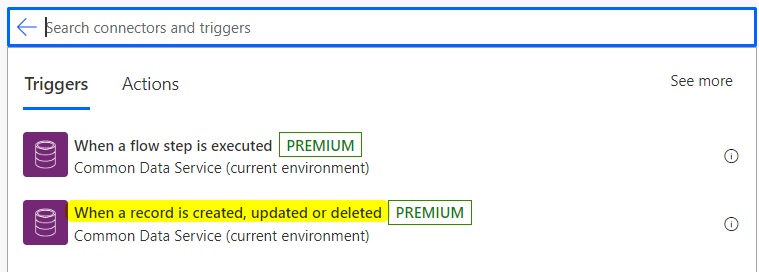
2. Now we create the Flow. Start by creating a Solution in Power Automate.
Notes:
Results: Based on the triggered condition mentioned in the Flow, whenever the action is triggered, the Flow would run and an email would be sent out to the Team Members.
In this scenario, we will try to accomplish the same thing using the out-of-the-box functionality. For this, the only requirement is we must have an Exchange license, as we are going to create a Distribution List in Exchange with the team members and use the same in Dynamics 365 to send out emails.
Please refer to the below steps to successfully send out emails to all the Team Members.
1. Let’s start by creating an Exchange Distribution List (DL).
Note: We would need to manually add/remove the team members whenever they are added/removed from the team in Dynamics 365.
2. We now must create a Queue in Dynamics 365.
Note: The status of the Mailbox would remain on Not Run.
3. Create a New Team or select an Existing Team. In the Default Queue lookup, select the Queue created in Step 2.
4. We now must create a workflow to automate the “send email” action based on our criteria for when it needs to be triggered.
5. So, to create a workflow that sends an email to the Team members whenever a new account is created, go to Send Email > Properties, and add the Queue created in Step 2 to the To field.
Results: Whenever the trigger condition is met in the workflow, an automated email is sent to all the Team members of the Team mentioned in the To field.
And there you have it! Two workarounds for the functionality limitation around sending emails to a team.
Happy Dynamics 365’ing!
Approach 1 reference is derived from the below article: