Many companies create silos within their data for security reasons. One way to do this is to increase Dynamics CRM security settings to make user-owned records read/write-only. This works, but it can also present some challenges.
For example, what if one of your sales reps approaches a client about some new products, without realizing that the sales rep two desks down has been in contact with the client about these opportunities for over a month? Now you have a flustered salesperson and an annoyed client.
Ideally we'd prevent this from happening by having all sales reps reference data in Dynamics CRM before approaching a client—but what the sales rep in our scenario doesn't have the security rights to see that information?
Luckily, there's a solution for this. We can create a new global entity that would have basic information about any entity—Accounts, Contacts, Opportunities, Leads, etc.—without revealing sensitive data. We would do this by creating a custom entity and running a workflow to copy over the data that isn't a "trade secret" (i.e., it can be found on Bing).
Let's walk through how to do this step-by-step.
-
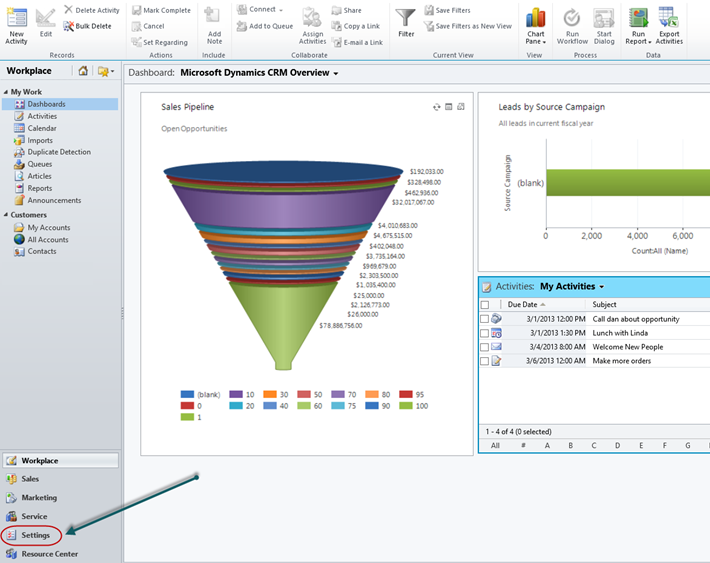
Go to settings on the bottom left corner of the page.
-
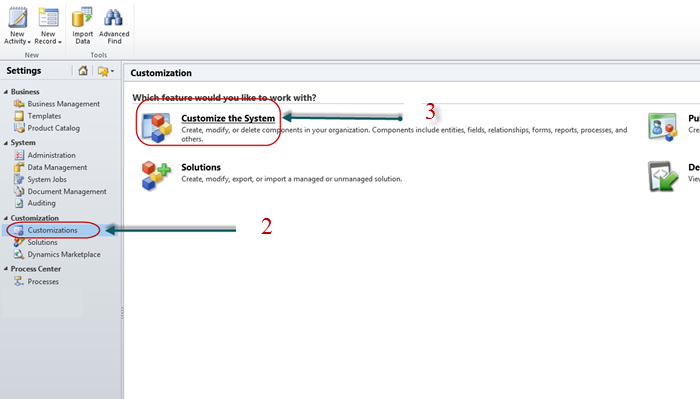
Once in the settings page, go to Customizations on the site map to the left.
-
Select "Customize the System."
Note: In order to make these customizations, you must have the correct security role/setting. Talk to your system administrator before continuing!
-
Once you are in the system, the "Components" button will show you almost everything in the system. You'll need to create a new entity. (It is recommended that you do not use the out of the box default of "new_" as the preface for your schema name. You can find more on that
here.)
-
Once you've created your custom entity, go to the out-of-the-box Accounts entity and expand the tab.
-
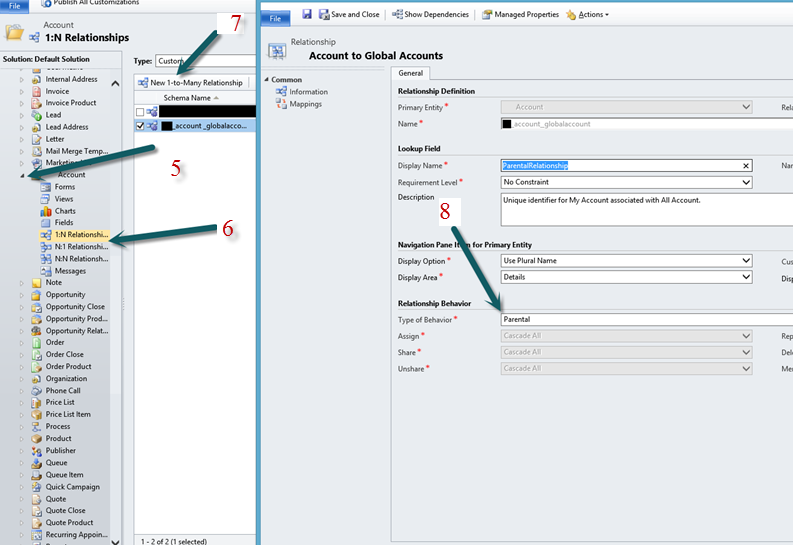
From the expanded tab, select the fifth item down—the "1:N Relationship."
(1:N means a one-to-many relationship. This means that there will be one Account record and the potential for multiple records to be associated to that Account record. For this situation, we're technically making a 1:1 or 1-to-1 relationship, but in terms of database language, relationships are either 1-to-many, many-to-1, or many-to-many.)
-
We want to create a new 1:N Relationship and set it to your new custom entity as the related entity.
-
In the example below, I created a custom entity called Global Accounts. This is where you'll set a parental relationship. We do this so that if the Account record is deleted or deactivated, the child records (e.g. the Global Accounts) will be deleted/deactivated as well as the "Type of Behavior" settings to Parental tells the system to cascade down to its children.
It's basically a waterfall—if you pour food coloring at the top (the parent record), everything below (the child record) gets that food coloring as well.
-
Now go into the form section of the Account entity and add in a field as a reference point for the system to look into. In this example, I called it allaccountlookup and make it a lookup field into my custom entity.

-
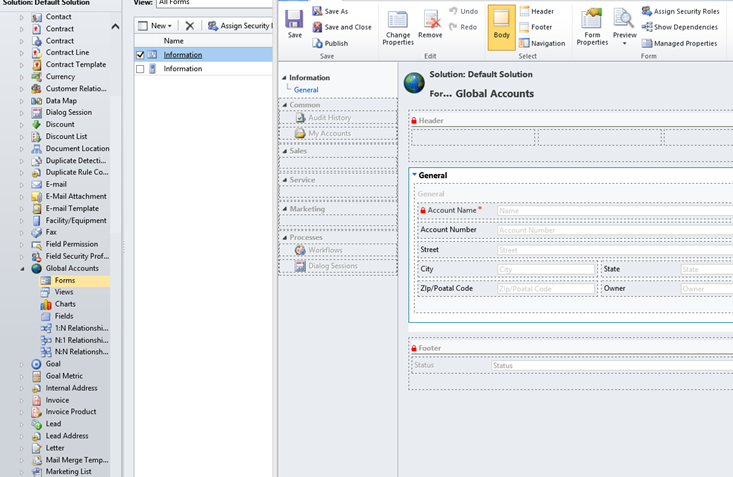
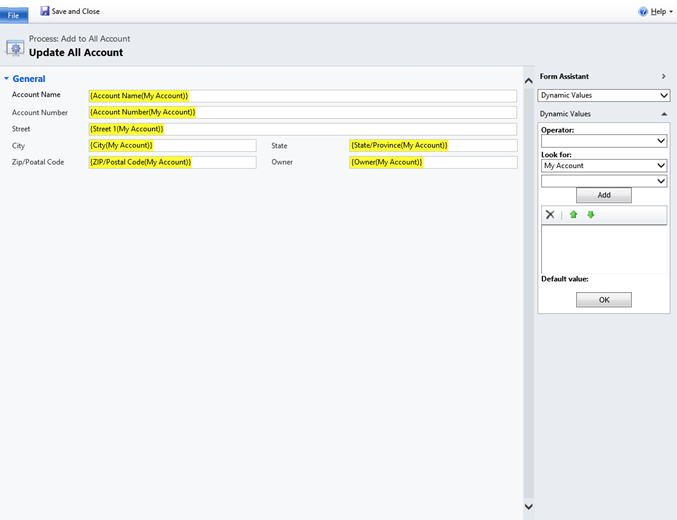
Now we'll go back to the custom entity and add in fields that we want to be viewed by the organization, team or group. Go to the custom entity, open up the form and customize it by adding in fields of your choice. In this example, I selected basic information like Account Name, Account Number, Street, City, State, Zip/Postal Code, and Owner. This way other users can quickly see who owns the record and basic information about the account.
-
Click the "Publish All Customizations" button in the top ribbon, because now we want to move on and create a workflow to fill in the records.
-
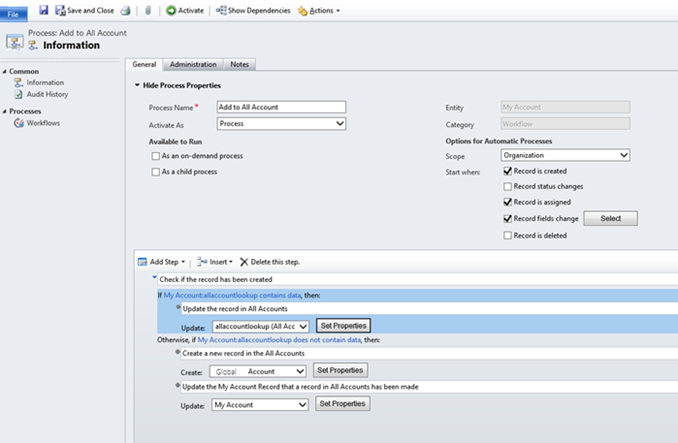
Go back to your main page and create a new process. Set the process to a workflow and name it to whatever convention you want. In this example, I renamed the out-of-the-box "Accounts" to "My Accounts". I'm going to run this workflow every time a record is created, assigned, or when any of the fields are changed in the parent entity.
-
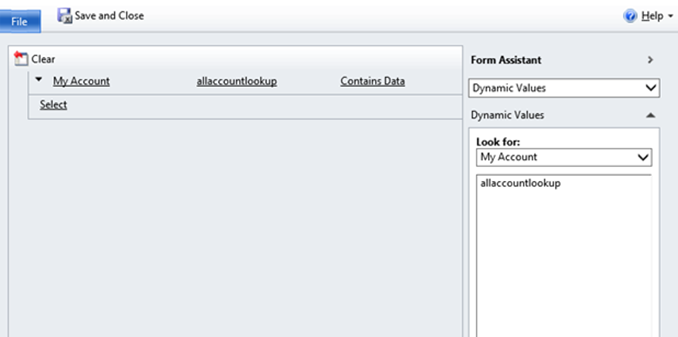
Now create a Check Condition and have it look at the parent "My Accounts" record. Set it to lookup into the allaccountlookup field and check if it contains data. You'll see I have it set to update the record fields in the All Account.
- Now we can create a Conditional Branch and do the same lookup, but instead of the allaccountlookup field containing data, we'll check for it to not contain data.
- Add a clause to create the record in t custom entity "Global Account" and have the same fill in fields as the image to the top right.
- Then in My Account (The Out of the Box Account) entity and make an Update into it.
-
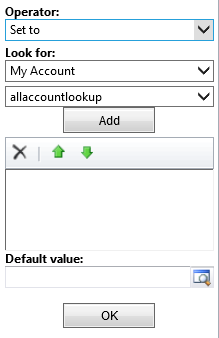
Set the properties by clicking on the custom field made in My Account, allaccountlookup, and set the operator on the right to "Set to". Make sure your workflow is set from User to Organization or to the specifications you want and activate your process. Also, be sure to make this read-only. We want this workflow to not write, as this is meant to be a reference:
-
We should also set up the relationship of the flow of data to be one-way from Account to Global Account. To do this, go to administration and select security roles. Go into each security role and make your custom entity Read for the organization but turn everything else off on it.

There you have it! Now you have a custom entity that is a nice reference for the entire organization.
Happy CRM'ing!


Neat idea which could be improved in a couple of ways:
- Since the intention is to make these records globally available, it probably makes sense to remind readers to make the ownership of the new custom entity "Organisation" (rather than user/team) so the security role is easier to get right.
- Parental relationship behaviour has nothing to do with deactivation, so you would need a workflow on the deactivation of the Account to also deactivate the global record so it does not give false-positive search results.
- You could also use the same principle for deletion (if Account is deleted then deactivate the global record since there is no option to delete the record from workflow). This would mean there is no need for the 1:N Account:Global relationship or Parental behaviour at all, the custom global record need only be a "parent" 1 of the N Account in a single direction via the lookup, not both ways.
- You can simplify the workflow considerably. Test to see if the lookup is NOT filled in. If true, create the new Global parent record but *just leave it all blank* and fill in the lookup to it back on the Account form. Now just do the update to the parent Global record via the lookup regardless of whether it was filled in to begin with or has just been done (ie after the IF, not inside it or in an 'Otherwise' clause). This way you only need to setup and maintain the fields you want to fill in on one form, not once in create and again in update step.